Memorial Day Salads: Salmon Salad, Grilled Radicchio Salad, Avocado and Tomato Salad

Happy Memorial Day Weekend, everyone. If you haven't already planned out all of your dishes for the many BBQ's you will be attending this weekend, consider one (or all) of these three salads. The components for each can be put together in moments, and complement grilled meats and veggies ever so well. I realized I maybe a little late in sharing my Memorial Day ideas, but here they are. There maybe a few posts today, so I can be sure to share as many ideas for your weekend entertaining as possible. Hope you enjoy and that you are able to spend some quality time with your friends and family.

Salmon Salad

Ingredients

  • 1 pound salmon, skin on
  • 1/2 cup leftover mashed potatoes (method here, dairy free option included)
  • 1/2 cup steamed cauliflower (or any other nice veggies you have around)
  • 1 cup mache salad greens (any greens will do here, esp. something peppery like arugula or mache)
  • Juice of 1/2 lemon
  • 3 tablespoons olive oil
  • salt and pepper to taste

Method

  1. Heat BBQ grill until super hot, but not smoking.
  2. Place the salmon, skin side down, on the BBQ grill.
  3. Cook for four minutes, or until you see the edges of the salmon turning light pink.
  4. Flip the salmon over and cook for an additional 5 minutes.
  5. Put the mache on a platter, add the mashed potatoes in dollops over the salad and distribute the cauliflower around the platter.
  6. Place the salmon on top and finish by drizzling the olive oil and lemon juice on top.

Grilled Radicchio Salad

Ingredients:

  • 1 head Radicchio
  • 1 large Shallot, minced
  • 2 ears Corn
  • 1 large Heirloom Tomato, chopped
  • 1 bunch Frisee, shredded
  • 1/3 cup Olive Oil
  • Salt and Pepper to Taste

Method:

  1. Heat BBQ grill until super hot, but not smoking.
  2. Cut up radicchio into chunks.
  3. Pour olive oil over radicchio on toss to coat.
  4. Place radicchio chunks on grill, grill on one side for two minutes, making sure flames don’t get too high.
  5. Turn radicchio over, pouring remaining oil onto it. Cook for two more minutes, or until soft.
  6. Remove from heat, and chop into smaller pieces.
  7. Take corn off the cobs, placing the loose kernels into a large bowl.
  8. Add tomatoes, shallots and grilled radicchio to bowl. Toss, gently pulling the radicchio leaves apart.
  9. Sprinkle shredded frisee on top of mix.
  10. Finish with a little olive oil, salt and pepper.

Avocado and Tomato Salad

Ingredients:

  • 2 large avocados, cut into chunks, skin and pit removed
  • 4 tomatoes (I used Roma, but love Heirlooms the best)
  • 1/4 cup olive oil
  • 1 lemon, juiced
  • Salt and pepper to taste

Method:

  1. In a large bowl, combine tomatoes and avocados with salt and pepper.
  2. Whisk together the oil and lemon juice in a small bowl.
  3. Pour the dressing over the tomatoes and avocados, stir gently to coat all ingredients and add a final grind of fresh black pepper on top.

Saveur Magazine's Torta Pisticcina, Chestnut Flour Tart

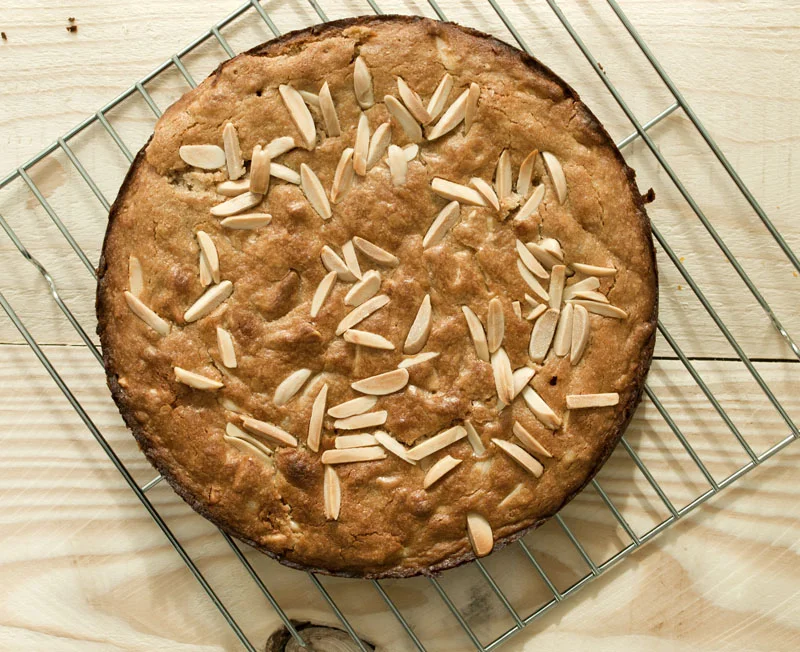
Hello? How excited was I to find a recipe that uses chestnut flour? I knew somewhere in the back of my mind that I'd heard of such a flour, but I had forgotten about it.

Well, Saveur magazine reminded me of it in their May 2012 issue. Their article on Corsica was lovely and filled with a bunch of interesting recipes. I was pleased to find the Torta Pisticcina recipe so that I could add another gluten-free dessert to my repertoire.

I used unflavored almond milk instead of regular milk, which I figured was fine, since the recipe includes both blanched and slivered almonds in it. There were a few things I did do wrong, which made the tart turn out not exactly right, but still pretty good.

Two mistakes, which I hope you won't make: salted butter and a cake pan that was two small.  Using salted butter instead of unsalted made the tart too salty. This is the second time this week that I've made that error. I've got to get some unsalted butter in my freezer. And, I also used an eight inch cake pan instead of the ten inch that the recipe calls for, making the middle of the tart too soft.

Even with these missteps, the tart was really tasty. The perfectly made one will make for a great mid-morning snack with a cup of tea.

Torta Pisticcina/ Chestnut Flour Tart

 Ingredients:

  • 12 tbsp. unsalted butter, melted, with more for greasing the pan
  • 1 cup sugar
  • 1/2 cup milk (I used almond milk here)
  • 1 tsp. vanilla extract
  • 1 tsp. kosher salt
  • Zest of 1/2 orange
  • 2 cups chestnut flour
  • 1/2 cup whole blanched almonds
  • 1/4 cup sliced almonds

Method:

  1. Heat oven to 375 degrees.
  2. Grease a 10" cake pan, set aside.
  3. Whisk butter, sugar, milk, vanilla, salt, and zest in a bowl.
  4. Add flour and whole almonds; stir until smooth.
  5. Pour batter into pan; sprinkle with sliced almonds.
  6. Bake until browned and set, about 25 minutes.

Bacon in the Oven

Joe makes bacon in the oven.

A seemingly simple statement. But, I need to point out that Joe, my dad, used to leave the house when Gran Fran would cook meats that were too strong smelling.

I'm not clear when he turned the corner and actually began cooking the bacon himself, but a few years ago, I walked into my parents house and saw him lining up strips of bacon on a jelly roll pan. I was intrigued.

He told me my mother, Gran Fran, had discovered that if she cooked the bacon in the oven, there was a lot less mess. And, Joe wasn't bothered by the smell. Let me point out that this was well after they had spent a good 45 years living together, so it goes to show you that you new things can happen late in a marriage!

This method does take a little bit longer, but it's worth the effort. The bacon comes out nice and crispy, but not burnt, with a some chewiness left in the fat.

Ingredients

  • 1 pound bacon, thick cut works really well, but any kind will do

Method

  1. Preheat the oven to 275 degrees.
  2. Place the bacon strips in one layer on a sheet pan.
  3. Cook the bacon for 40 minutes then raise the heat to 400 and cook for another 5 to 10 minutes.
  4. Remove the bacon from the oven once it has become nicely browned.

Re Post from Paris: Croque Madame, Versailles Gardens

Please enjoy this repost from our Paris trip in 2010. The nice weather here in SF keeps bringing me back to Versailles with its lovely gardens and hidden groves.

I will admit that up until this point, I was afraid of the cheese aspect of the Croque. But, last night, Kristen ordered one and assured me it was just a mild cheese, so today, I ordered one.

To be honest, I didn’t realize that the croque madame came with an egg on top. It never occured to me to ask what the difference was between the monsieur and hte madame. Boy am I happy I did.

There are probably better specimens of the croque madame, but this made my day! The oozing egg over the ham and melted cheese was divine.

I am totally going to make these as often as my waistline will permit. What a treat!

Here is a link to a great croque madame recipe.