Beet Salad with Oranges

 Gran Fran knows her way around beets. She would make them for us on a regular basis. Her salad involves only some olive oil and vinegar. And, she also cooks her with the skin on, removing it after cooking. Her method involves roasting the beets in the oven individually wrapped in foil (Gran Fran, let me know if I'm wrong here). Skinning the hot beets made me stay away from beet cooking for a good long time. My hands not only turned red from the juice, but also were slightly burned each time I tried to de-skin one of the beets.

My sister Danielle taught me this method, which turns your fingers red immediately, but leaves you with fewer burn marks on your hands. I think I end up with more beets, too. Using a vegetable peeler allows you to remove just the brown skin and preserve more of the good stuff.

I cook the beets in what will become the dressing for the final product, too, which gives you a really flavorful dressing. And, you are able to eat these hot, if you want to, without having to waste any time peeling off the skin.

The addition of oranges and sunflower seeds to this salad make it the perfect Spring-is-Here dish. It's fruity and earthy with just a little bit of crunch.

Featured on The Fruit Guys website.

Beet Salad with Oranges

INGREDIENTS

  • 3 beets, skins peeled off, greens removed, cut into eighths.
  • 1 small shallot, cut into quarters
  • 2 tablespoons red wine vinegar
  • 2 tablespoons olive oil
  • 1 orange cut into small pieces
  • 1/2 teaspoon sunflower seeds
  • Salt and pepper to taste

PREPARATION

  1. Preheat the oven to 425 degrees.
  2. Place the beet and shallots onto a rimmed baking sheet, or into a baking pan large enough to allow space between the pieces.
  3. Mix together the vinegar, oil, salt and pepper and pour the mixture over the beets, making sure to coat all sides of the beets.
  4. Roast the beets in the oven for 40 minutes, or until fork tender, turning the beets every ten minutes or so.
  5. In a large bowl, mix together the warm beets with the orange segments.

Pasta with Romanesco Cauliflower...A Reminder of the Past

While I was pulling together all of the ingredients for this dish, I made a very interesting discovery.

I've been preparing to shoot and write this blog for close to 30 years.

In tenth grade we had to present a how-to project, complete with step-by-step instructions.  You know what I chose as my subject? My mom's pasta broccoli dish.

I remember being in the kitchen with Gran Fran, taking pictures with my sister's camera of each and every step of the process. My sister was kind enough to develop and print the photos for me, as she was a big-time college art student at the time. Suffice it to say, I was the only kid in the class who chose a food project, and who bothered to bring a big bowl of the finished product for the class to share.

Fast-forward to this past weekend when I found myself in my local farmer's market and I came across the above specimen of romanesco cauliflower. It took me a long time to take a knife to it, for fear of totally hacking it all to bits and losing the great geometric shapes that make up the whole. I carefully cut into the bottom of the stem and began to take the pieces off the stem. They were firm enough to keep their shape.

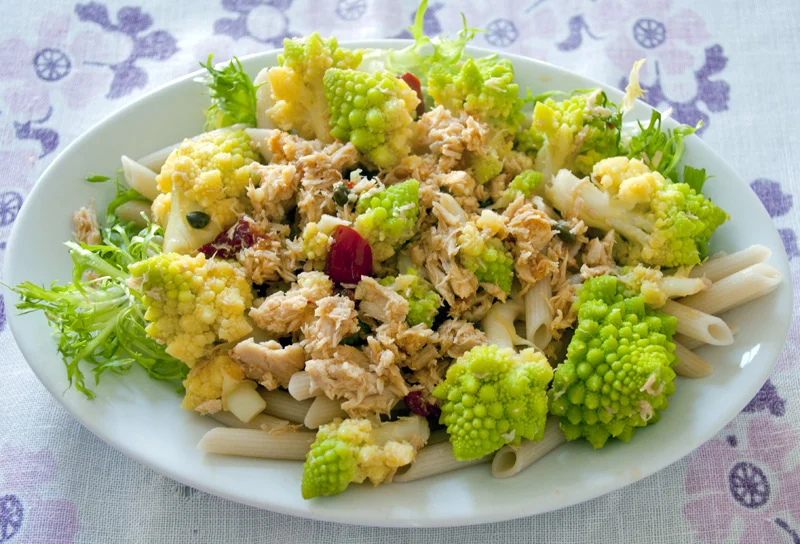
I was immediately brought back to my mom's kitchen the moment I put the parboiled romanesco into the hot saute pan to brown. Gran Fran makes very simple food, but with complex flavors. I took some liberties with her original recipe, and added some tuna, spicy italian vinegar pickled peppers and capers. It wasn't exactly like hers, but it sure was close, and it tasted the same as it did 30 years ago.

Like home.

Gluten-Free Pasta with Romanesco Cauliflower

Ingredients:

  • 1 head Romanesco Cauliflower, cut into florets
  • 1 can Solid White Tuna, drained
  • 1/2 cup Olive Oil
  • 2 cups Pasta, cooked (I used gluten-free rice pasta like this one from Tinkyada)
  • 3 Tbsps Capers, drained
  • 4 Pickled Italian Cherry Peppers

Method:

  • Boil a large pot of salted water.
  • Chop the peppers into small pieces, removing the stems.
  • Once the water has boiled, add the pasta and a steamer basket on top of the pasta to parboil the romanesco cauliflower.
  • Cook the romanesco for 3 minutes with the lid on.
  • While the pasta/romanesco is boiling, heat a large skillet over high heat.
  • Put the olive oil and the tuna in the saute pan and cook for 1 minute on high heat.
  • Add the parboiled romanesco to the saute pan and cook for five minutes, or until beginning to brown.
  • Put the capers and peppers in with the romanesco and cook for three minutes.
  • Drain the pasta, rinse in cool water and  put in a large bowl.
  • Mix the pasta and the tuna/romaesco mixture together and enjoy!

Anchovy Toast: The 'Chovy Saga Continues On

Are you sick of me and my anchovies yet? This is likely to be my last post about the little fish that I love for awhile as I seem to have run out of anchovies in my pantry. And, I'd like to feature other ingredients, so will probably take the 'chovies off the list for a bit so as not to bore you (or my taste buds). But, I just couldn't deprive you of this toasty treat.

I often find myself not really eating all that much while I'm shooting and writing. Eventually, I do eat what I'm working on, but I guess I just get so into my work that I kind of forget to eat. Funny, since I'm working with food (I know you got that, just had to say it, too).

The toast pictured above has been fried and covered with onion and shallot marmalade, topped with an anchovy and some black pepper. I know, it's not for everyone, but it certainly made my day.

Fried Toast with Anchovy

Ingredients:

Method:

  1. Heat a small skillet over high heat.
  2. Add the olive oil to the pan and heat up until just before the oil smokes.
  3. Fry the bead on both sides until it's as brown as you'd like it.
  4. Serve by putting the onion and shallot marmalade on the toast and topping it off with the anchovy and some pepper.

If you eat cheese, you can also add some grated Parmesan on top.